
Page 22 - January February 2002
P. 22
expect the roofing material is also laser-cut to represent tarpaper strips. AMB supply a cast metal chimney, which fits in a slot cut in the roof. I added a few signs (not sup- plied) to my cafÈ and was ready in no time to “plant” the building on the main street of Springfield.
Ease of Construction: 9 out of 10 (10 being easy)
Construction time: 6 hours Bang for your buck: 9 out of 10 Space required: 4.5” x 2.5”
It is not surprising that AMB kits are a big success; the ease of construction has to be seen to be believed. Their wide range offers some very authentic Americana and whether you model ATSF, ACL, CBQ, DRGW, GN, IC, NP, PRR, RGS, SP, UP they seem to have a depot to suit you.
JL Innovative Design
This company’s kits are a stark contrast to the laser-cut offerings of others but they do depict interesting Americana albeit using tried and tested methods of construction.
Most kits are available in HO scale but a few offerings are also being released in N scale. This model is based on a typical post- war transition period hamburger joint be- fore the popular MacDonald’s and Burger King chains made their appearance. It is a wooden A-frame building with a kitchen extension on the rear and will look right at home in any 40’s-70’s scene.
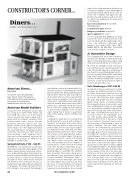
Val’s Hamburgers #131 $24.95
As with all JL kits you will need to cut the openings for windows and doors before you start. On the plus side there are only five to cut out anyway so this is not a hard as it looks. Once this was done I painted the walls and decided on the somewhat garish colour scheme of orange and grey. The Howard Johnson chain used to paint their establishments turquoise and orange so to my mind this is fairly prototypical. The latticework along each wall characterises this type of building and each piece of stock wood has to be individually cut to size. The acetate representing the large windows at the front of Val’s are a critical fit as no interior corner posts were used on the front walls of the building to allow for interior detailing. The rear walls were joined to the side-walls by using interior corner posts cut to fit. The front walls were just edge glued. The front and rear roofs are made from cardstock cut to fit and cov- ered with paper cut into strips to represent tarpaper. The A-frame roof is plastic repre- senting a shingled roof and was just glued in position. JL provide neat signs to dress up the front of the diner to which I added some additional signs to the window glass using my normal white glue that dries clear. A nice feature of the kit is the Val’s sign, which you cut from sheet wood using the paper sign as a guide and then support it on a wooden dowel cut to fit. The diner was set on my usual forecourt made from black styrene sprayed concrete grey. The exterior and interior just begs for extra de- tailing.
CONSTRUCTOR’S CORNER...
Diners...
by Mike Carter (E8carter@cs.com)
Springfield Café
American Diners...
Part One
On my HO scale Sierra Nevada I have tried to make the layout a little different by incorporating kits from other less well-known manufacturers into the scene.
American Model Builders
If you have never tried a laser-cut wood kit you could do no better than trying a kit from AMB who offer one of the widest choices around. The range is huge with a great selection of depots, elevators, inter- locking towers, barns, houses, line-side businesses and even caboose kits. One thing is certain even though you may baulk at the initial cost of their higher-priced kits the result will almost certainly be perfect every time. These kits are 100% laser-cut and everything - walls, windows, doors, trim even roofing material has been de- signed for an accurate fit. AMB kits are available in several scales.
Springfield Café #136 - $26.95
All AMB kits come packed in a white box with a black and white photograph of the model. Inside will be found clear instruc- tions and a painting guide. The kit parts are packed in a plastic bag and all the parts are in carrier sheets. It is best to try and keep the parts in these carrier sheets until you need them in the construction process, as many of parts are rather delicate and prone to breakage. The hardest bit about these kits is trying to stop yourself from diving in
and starting construction immediately. For the best results you should be patient and paint the parts first. Having said that paint- ing has been made as easy as possible as all the parts that need to be painted the same colour are usually set out on the same carrier sheet. I painted the main walls white with the window frames and other trim in yellow. As is usual with wood kits I find it best to either use a spray can or an airbrush to prevent the warping of the wooden walls. Failing that it is best to paint both sides of the walls in order to minimise the problem.
I detailed the walls prior to erecting them by distressing the wood with a blade to represent wood grain and used a dress- maker’s pounce wheel to make nail holes in the boards. This kit is as easy as a plastic kit inasmuch as the walls and roof have tabs that interlock with each other to make the structure. I then applied yellow carpen- ter’s glue to the inside edges. Trim pieces are applied over the corners of the build- ing, which neatly conceal the tabs and slots. The windows and doors comprise of several pieces of thin wood that overlay each other. No glue is required as you po- sition the part and remove a peel-n-stick backing paper to assemble the window. Care should be taken when doing this as the adhesive is very strong and it is difficult to correct mistakes. The window “glass” is also laser-cut and is backed by a protective fine tissue paper. If you wish you can leave the tissue on a few windows to represent blinds. You can also position the sash to represent an open window. As you would
22 ROUNDHOUSE
