
Page 19 - March April 2000
P. 19
gold scroll work decoration applied on top of the high gloss black paint. The sand box also has an actuating lever for the delivery of sand, through to the cab.
Turned brass stanchions and handrails are fitted and an air cylinder, again with all relevant piping, is located on the engineer’s side. The running boards are plastic mouldings with a very good representation of wood graining, painted gloss black with white edge lining.
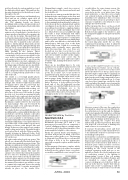
The cab, a very large item on these locos, is again wood coloured plastic. Another first for a mass-produced model are the opening cab doors onto the foot plate. The matt black cab roof has the characteristic long overhang at the rear. More brass hand rails are fitted and the name “Rio Alto” is painted on the cab sides. Inside is full backhead detail with all the gauges, piping, throttle, sight glass fittings and even an oilcan on the shelf above the firebox door. The opening firebox door reveals red LEDs glowing in the firebox. These synchronise with the motor load and flicker convincingly. Seat boxes are provided for the crew - in fact everything you would see on the real engine is there for all to see. Even the working fall plate is not just a plain piece of plastic - it is correctly hinged and if lifted up the hinge support brackets are also modelled. The cab steps are separate metal items, characteristic for this type of loco with a single, chequered surface step mounted at the end of a round pedestal and bolted to each side of the cab.
The tender is a very high quality plastic moulding with separate parts including the brake-staff, wheels, chain hangers and pickups. The tender footplate has moulded woodgrain effect and the end beam has nut/bolt/washer details. The truck side frames are fully detailed with working coil springs and chain hangers as per the prototype. At the rear of the tender is a large wooden tool box with an opening lid with hinge detail. Scale coupler pockets are fitted together with a full width end step. A link and pin coupler is fitted. However a standard Bachmann coupler is fitted to the rear truck for train haulage. This can be released by undoing a single screw, and replaced with a Kadee or whatever you use.
The tender body is a beautifully done plastic moulding with a commendably thin lip to the nicely done curved top. A plastic coal load is moulded in, together with front boards where the coal is available to the fireman on the footplate. On his side of the tender is the brass wire brake stakk with a correct patter wheel on top. Either side of the tender top are more opening toolboxes with hinged lids and details. At the rear of the tender top is a rather small looking water hatch. The paint finish is a rich gloss black, with the Denver and Rio Grande lettering in Railroad Gothic Gold shaded red, with gold pin striping, and a gold #87 on the rear.
All eight tender wheels pick up power. The wheels are chemically blackened and have fine white tyres painted as per prototype. The pickups are sprung steel strips bearing on the axles. All wiring is enclosed within the tender, finishing up at three-pin and two-pin boards under the tender chassis. The take two separate sets of wires that emerge from under the loco. The loco drawbar is a plain metal item that mates with a metal pin under the tender footplate. This fact is not mentioned in the instructions and could cause problems for the unwary. The tender is pre-wired to accept a commercial sound unit, hence the wiring sockets mentioned. A speaker mounting is already in place on the tender floor.
Dismantling is simple - undo two screws at the front corners of the chassis underside and the body lifts off.
So how do you sum up a model like this? It is definitely in the same league as the Shay and the climax. My only slight disappointments were that I’d have preferred a matt black finish to the running boards and tender footplate, to better show up the wood grain detail, and the crew figures do not do the loco justice. In fact it would have been better to supply no figures as they are too toylike and impart this to the loco. Much better ones are available through the trade. I hope Bachmann will either improve these in future, or omit them. One other criticism is the way the loco and tender couple together. I found the very small plugs and sockets very difficult to deal with in the limited space, and very close to the front tender brake beam. I think it is certain that damage with eventually ensue, especially when disconnecting. Also once these are hooked up, you have to put the loco and tender together. I can honestly say this is the only serious fault I can find on this engine. Bachmann could easily correct this by repositioning the sockets under the tender footplate edge, making them much easier to deal with.
There are no moulding lines to be seen anywhere. You would be hard pressed to tell the boiler was made of plastic, not metal. Once again, Bachmann have delivered the goods. An accurate 1:20.3 scale model of arguably the most famous type of American loco ever built. Though short-lived on the narrow gauge, being ousted by 2-8-0’s, they were equally at home on freight or passenger duties. However it looks really good at the head end of the old fashioned wooden passenger cars, and the D&RG livery sits very well indeed. Bachmann are to be congratulated for producing another first class model for this scale. Let’s hope the 2-8-0 will appear in the not-too-distant future.
PRODUCT REVIEW by The Editor
Spectrum 4-8-2
I had the ‘pleasure’ of working on the new HO Bachmann Spectrum 4-8-2 and a 7 car passenger set recently. The set comprised 3 coaches, a Pullman, a diner, a combine and an observation, all 12 wheel heavyweights. A few points might be helpful to other owners. Firstly the general finish and detailing is excellent and put me in mind of the best European coaches by Roco etc. The lettering is sharp and clear. Where these coach models fall down a little is in the engineering, especially as regards couplers and the built-in lighting.
1) The magnetic Eezi-mate couplers, which are the plastic Kadee look-a-likes, are retained in their boxes by a plastic lower cover plate, secured by a small black screw (except for one
car which has, for some strange reason, the earlier “Athearn-like” clip-on covers.) The screw holes in the cover plates have been made undersize, so that the screw actually cuts a thread in them on the way through. I found this to be a hindrance. The cover seats far better if the hole in it is opened up to have clearance round the screw (which of course still taps into the box itself.)
2) The trip pins, like those on the good old Kadee #5 knuckle, are too low. Bend them up about 0.5 mm before you start installation. Both these hints apply to the tender too, and the trip pin bit applies to the pilot-mounted coupler.
3) The passenger cars have body-mounted coupler boxes which swivel, being linked to the truck king pins inside the car. This sophisticated mounting is fine if adjusted correctly. There is an odd inconsistency across the 7 car set.
In one car, the coupler boxes pivot on screws, coming down into bushes on top of them, from inside the car. If too loose, this screw allows the whole box to droop, and accurate knuckle height is impossible to maintain. If the screw is too tight, the knuckle height is right, but the truck swing is impeded because the whole linkage is tightened up. So if any cars show these symptoms, unclip the body shell, and adjust the small screw securing the coupler box/s. Take the slop out of the box but check the truck still swings easily.
However, on most of the cars, the coupler box is retained in a much poorer way. The plastic boss which projects up through the linkage crank is just squashed flat with a hot soldering iron. This makes for a sloppy fit which is not easily adjusted. I found that by applying a hot iron to both the linkage and the plastic boss, while supporting the coupler box from underneath, produced a better fit. But if this ever snaps off you are back to finding very small screws to re-secure the box.
If you have broad radius curves and don’t need this system, you could cement the boxes to the underside of the floor and remove the truck linkages altogether.
4) I found the coach interior assembly patchy. After removing the roof - with great difficulty, by pressing 6 catches underneath the floor - I found some of the interiors had broken or detached parts which needed correction before proceeding. This included the seating moulding in one coach, several of the vestibule separation walls and one or two underfloor details. Also the hit-and-miss way of conducting current to the lighting is disappointing. A pair of fine coil springs project down inside the window Perspex, and are intended to contact small “finger” contacts sticking up out of the floor. Well, as they say in the movies, “maybe they will, an’ maybe they won’t!” Considering it will be rarely necessary to remove the roof, it would
APRIL 2000 19
